Colony FlowField guide
Home/Level library/Level 157
Complete recorded route

Colony Flow Level 157The brown and white dog

Follow 25 selections from the starting tray to the recorded finish. Check the box counts, linked groups and waiting points against your own board.

Visually reviewed 2026-10-14 · Match this recorded layout

Match this starting board.

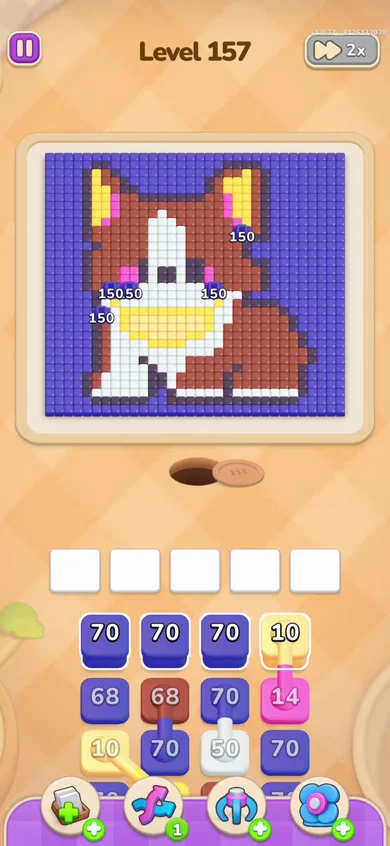
Match the brown and white dog and its 4 stacks. The front row reads blue 70, blue 70, blue 70, pale yellow 10, from left to right.

Starting picture and tray in the credited Level 157 recording
Starting board · source at 0:10

Front row, from left to right · 4 stacks

  1. Stack 1blue 70
  2. Stack 2blue 70
  3. Stack 3blue 70
  4. Stack 4pale yellow 10

If the picture or front row differs, use a recording that matches your layout.

From the first box to the recorded clear

Complete box order.

Select the boxes in this order. Numbers below are the counts before selection. Positions refer to the stacks currently visible, counted from the left. When a stack empties, count the remaining stacks again.

Wait for room. A single box needs one empty slot. Linked boxes need two; a three-box chain needs three. A tap with too few spaces does not add a box. Video times help you find a move; follow your queue state instead of matching the clock.
  1. blue 70left of four
    1 slot0:11 ↗
  2. blue 70second of four
    1 slot0:11 ↗
  3. blue 70third of four
    1 slot0:11 ↗
  4. blue 68left of four
    1 slot0:12 ↗
  5. brown 68second of four

    Linked with blue 70 directly underneath.

    2 slots0:35 ↗
  6. pale yellow 10left of four

    Linked with yellow 49 in the second stack.

    2 slots0:36 ↗
  7. blue 70left of four
    1 slot0:37 ↗
  8. blue 70second of four
    1 slot1:04 ↗
  9. blue 70left of four
    1 slot1:25 ↗
  10. blue 140left of four
    1 slot1:50 ↗
  11. dark 30left of four
    1 slot2:37 ↗
  12. white 51left of four
    1 slot2:52 ↗
  13. blue 70middle of three

    Linked with white 50 directly underneath.

    2 slots3:29 ↗
  14. brown 65middle of three
    1 slot3:30 ↗
  15. blue 70middle of three
    1 slot3:52 ↗
  16. dark 24middle of three

    Linked with dark 30 directly underneath.

    2 slots4:02 ↗
  17. blue 60middle of three
    1 slot4:14 ↗
  18. pale yellow 10right of two

    Linked with magenta 14 directly underneath.

    2 slots4:35 ↗
  19. blue 70right of two
    1 slot4:35 ↗
  20. blue 70right of two
    1 slot4:57 ↗
  21. blue 70right of two
    1 slot5:26 ↗
  22. brown 70right of two
    1 slot5:58 ↗
  23. white 50right of two
    1 slot6:35 ↗
  24. dark 30right of two
    1 slot7:14 ↗
  25. brown 65only remaining

    Linked with dark 30 directly underneath.

    2 slots7:47 ↗

Where to pause and check.

Four blue boxes before the linked colours

Take blue 70 from the left, second and third stacks, then blue 68 from the left. The source then sends the second-stack brown 68/blue 70 pair at 0:35. The 58 and 60 labels seen earlier in the queue are remaining counts, not additional box selections.

Check the source at 0:12 ↗

The left blue 140 box

The two left blue 70 boxes are separated by a second-stack blue 70. Blue 140 is next on the left, followed by dark 30 and white 51. These moves leave three stacks and preserve the original second-stack brown 65/dark 30 pair until the end.

Check the source at 1:50 ↗

Three separate blue 70 boxes on the right

After pale yellow 10 with magenta 14, the right stack supplies three blue 70 boxes at 4:35, 4:57 and 5:26. Follow with brown 70, white 50 and dark 30. Wait for two spaces before sending the final brown 65/dark 30 pair.

Check the source at 4:57 ↗

Check the clear.

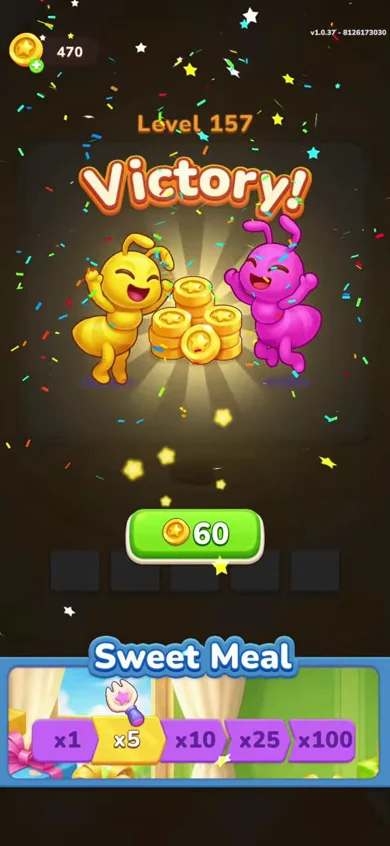
After the last selection, let the active boxes finish. The source reaches a cleared board or its victory screen near 8:04.

Cleared board or victory screen at the end of the credited Level 157 recording
Recorded finish · source at 8:04

Still frames from Crazy Games Walkthrough’s linked recording. Game artwork belongs to its owners.

Watch the complete source.

Source video preview for Colony Flow Level 157

By Crazy Games Walkthrough · Open on YouTube ↗

Recording and verification.

The written sequence, linked boxes and finish were visually checked against the complete credited recording on 2026-10-14. Blocked taps are excluded from the box order.

Recorded mobile gameplay. The platform and build number have not been confirmed. This route has not been played through on the current installed release; match the picture and starting tray before using it.

This written route currently relies on one complete recording. An independent playthrough of the same layout has not been confirmed here.

If your run diverges.

My box did not move into a slot.

Check the empty slots and every linked partner. A linked group cannot move while a partner remains buried in a stack. Wait for the needed spaces, expose the partners in the listed order, and compare the next checkpoint.

Same level number, different picture?

Compare the artwork, obstacles and starting row. Layouts can change. Use the level library to find a recording that matches your board; keep moves from one layout together.

The source video will not load?

Open the credited YouTube link directly. Playback depends on YouTube and your connection. The written order and board checks remain readable without the player.